|
|
马上注册,结交更多好友,享用更多功能,让你轻松玩转社区
您需要 登录 才可以下载或查看,没有账号?立即注册
×
这是一个英文教程:这是我做的实物http://www.meipai.com/media/557711075
About this project
This project was developed after I had to find out that controlling my RGB ambient light with the normal infrared remote control was complicated and not reliable. Within a few months I build this solution that enabled controlling my LEDs with a Bluetooth-enabled Android Device running a self programmed app. On the hardware side an Arduino is receiving the commands and controlling three PWM signals.
The app is available at Google Play for free (but closed source), the Arduino sketch is released under Apache License. The used protocol is also documented in this wiki and open for usage by others.
If you like this project I would be pleased with recommendations or a good rating at Google Play. Let me also know when you find some bugs.
Requirements
You need a few things to get started:
[li]Arduino Uno[/li][li]Android powered Phone/Tablet with bluetooth running Android 4.0 or above[/li][li]RGB-LED-Stripes with common anode (one common '+' and a seperate '-/GND' for each color) (you can also use stripes with common cathodes, but the showed circuit diagramm will not work (in particular the output stage). A solution therefore is also available.)[/li][li]External Power Supply (to power Arduino and LEDs)[/li][li]USART capable bluetooth module (for example HC-06, available on ebay for < 10$)[/li][li]3x 220 Ohm resistors (gate current limiter)[/li][li]3x 10 kOhm resistors (gate pull-down)[/li][li]3x N-Channel Power-MOSFETs (enhancement mode) (for example IRF1404)[/li] optional voltage divider
[li]1x 4,7 kOhm resistor[/li][li]1x 10 kOhm resistor[/li]
Assembly
Connect the Arduino and the others parts as showed below. Be sure that you do not change the RX pin with the TX pin of the bluetooth module. In General: RX of the bluetooth module has to be connected to TX of Arduino and vice versa.
Associated Fritzing File
Caution: The HC-06 bluetooth module I bought works with 3,3V. You can power it with 5V because there is a built-in voltage regulator (make sure that yours has also one or power it with 3,3V), but RX and TX are not 5V tolerant. To avoid permanent damage the Arduino output-voltage is reduced to 3,3V by a voltage divider (therefore the 4k7 and 10k resistors). On the other hand a special step-up circuit is not necessary because the Arduino recognizes 3,3V of the bluetooth module as HIGH-Level.
Note: For permanent installations you should consider soldering your circuit on a Arduino Proto Shield (bought or home made). I personally soldered everything on a stripboard and put the whole thing in a small case.
Note: You don't need the connection from TX (pin 3) on Arduino to RX of the bluetooth module, because currently nothing will be send back to the Android device. Just remove the connection from pin 3 (Arduino) to RX (bluetooth module) and the voltage divider. It may be possible that a bidirectional communication will be used in future releases.
Installing the software
You're almost done. Now you need to install the software and select the target device.
Troubleshooting
There are several reasons why your circuit may not work as intended. Here are some possibilities:
[li]Check if the LED voltage is high enough and your stripes have the right polarity by connecting them directly to your power source.[/li][li]Are RX and TX connected in the right way? Read also the notes above.[/li][li]By default, the Arduino sends some debug data to the PC via the hardware serial. If the Software in Arduino behaves abnormal check the console log.[/li][li]In case you are not sure whether your bluetooth module works properly or not, connect it directly to your Arduino (still keeping the voltage levels in mind, see note above). Therefore you have to remove the 328P chip temporary from your Uno.[/li][li]To check the output stage, you can try pulling the gate of each channel to ground or +5V.[/li] thanks:https://github.com/fennel-labs |
|


 闽公网安备35062302000276号 | 闽ICP备2024076463号-1 | 论坛技术支持QQ群171867948 | 论坛问题,充值问题请联系QQ1308068381


 再发某公司的PADS格式 PCB封装库全套共享
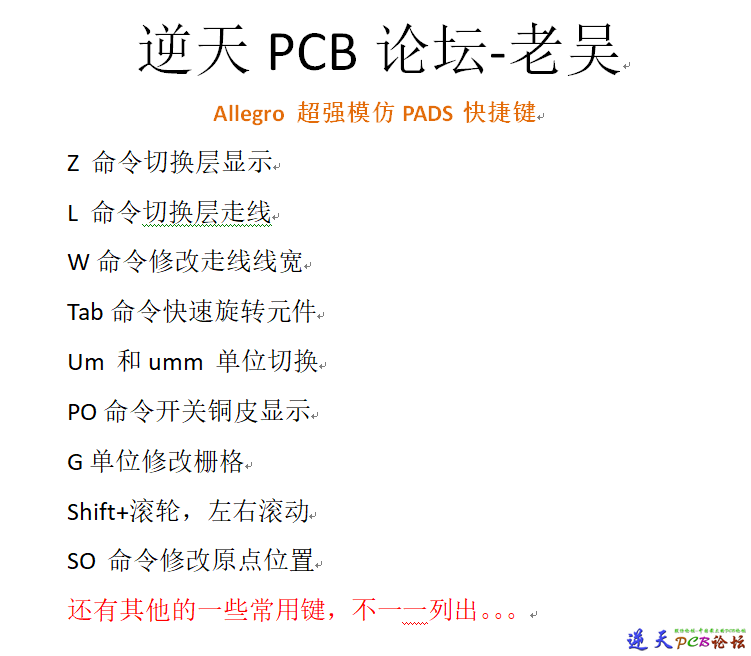 Allegro超强最全模仿PADS快捷键实现Z切换层
 IP2366充电宝设计方案原理图PCB
 XL1507 可调电源模块PCB文件
 LM2596 可调电源模块PCB文件
 Intel Alder Lake N100 笔记本电脑主板PCB
 STM32F103C8T6 做的DST手柄遥控器PCB文件共
 allegro羊皮卷
 intel英特尔I7电脑主板实战录像
 51单片机C语言及汇编语言实用程序设计-李萍
 8SEG×8GRID点阵驱动VK16K33C大电流数码管
 4000多个元件的AD PCB封装库和原理图封装库
 40V/16A有刷直流电机H桥电机驱动器-SS6548D
 恒流电源原理图(24-32V)
 AD5391BSTZ-3 做的树莓派 4 专用 HAT 扩展板,16 通道PCB和原理图
 瞧一瞧18层模块电源板DSPIC33FJ16GS502+LP3961+NCP1031
 配套STM32H7核心板的主板
 基于XCZU27DR设计的18层射频采集与处理板卡
 MTK6228手机主板PCB及原理图AXK7L30227+TLA09ZZA
 JC-AGL-萃茶机升级版 控制板PCB文件
 基于官方EVK改进的HPM6880开发板 PCB和原理图


 发表于 2017-9-25 21:30
 提升卡
 置顶卡
 变色卡(高亮)
 千斤顶
 照妖镜


 发表于 2017-9-26 11:36


